Introduction
Designing a course curriculum is a crucial step in creating an effective and engaging online course. Your course curriculum serves as the backbone of your course, providing structure and direction for your students as they work through the material. However, designing a curriculum that effectively delivers your content and engages your students requires careful planning and consideration.
In this lesson, we’re going to learn about designing your course curriculum so you can finally get it done in a way that helps your students learn. We’ll cover the process of designing your course curriculum, enabling you to construct it in a manner that facilitates your students’ learning through the right sequences, good titles, and excellent teaching techniques.
Challenges online course creators can face if they don’t design their course curriculum:
- A lack of structure and organization can confuse learners and make it difficult for them to follow the course.
- Insufficient content can lead to learners feeling like they didn’t get their money’s worth and result in negative reviews.
- Poor pacing can cause learners to feel overwhelmed or bored, leading to reduced engagement and motivation.
- Failing to address common questions or concerns can result in confusion and frustration among learners.
- Neglecting to update the course content can quickly render it outdated and irrelevant, resulting in negative feedback and decreased enrollment.
Video Lesson – How To Design an Effective and Engaging Online Course Curriculum
Who Can Use Course Curriculum?
- Graphic designers can use course curricula to create courses that teach the principles of design, such as color theory, typography, and layout.
- Writers can use course curricula to create courses that teach the craft of writing, such as how to develop characters, plot a story, or write effective dialogue.
- Sculptors can utilize course curricula to create courses that teach the techniques and tools of sculpting, such as carving, modeling, or casting.
- Fashion designers can use course curricula to establish courses that teach the fundamentals of fashion design, such as sketching, pattern-making, and garment construction.
- Photographers can use course curricula to create courses that teach the principles of photography, such as lighting, composition, and exposure.
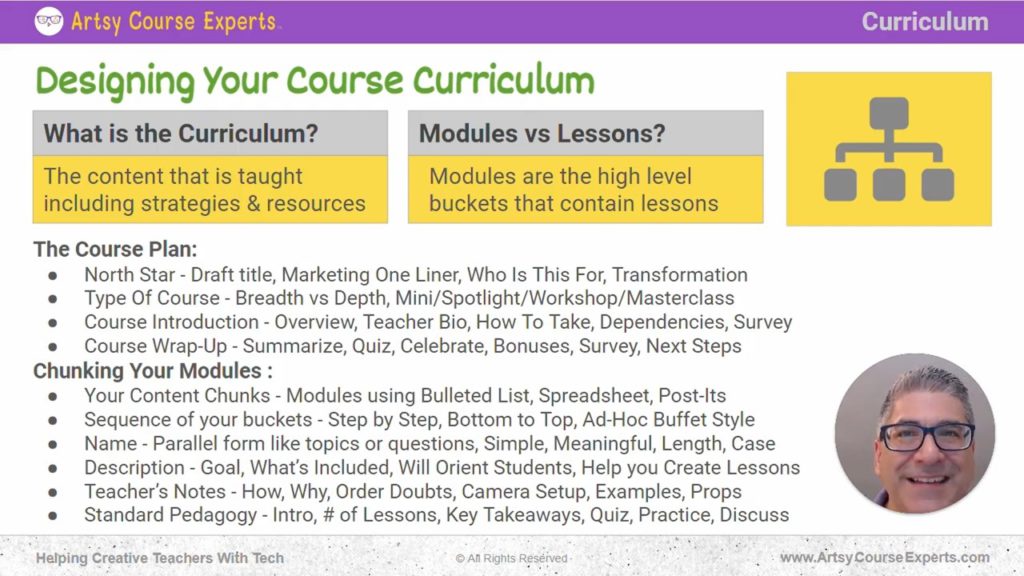
What is the Curriculum?
Curriculum refers to the overall design and plan of a course or educational program. It outlines the goals, objectives, and learning outcomes, as well as the methods and materials used to achieve them. A well-designed curriculum provides a clear roadmap for both instructors and learners, ensuring everyone is on the same page and working towards the same objectives.
The curriculum encompasses the content taught in your course. It includes the outline, all the content, modules, and lessons, as well as the strategies and resources that you provide as the teacher. You’ll use the curriculum to market your course. It might be showcased on your sales page, highlighting key modules as features and benefits.
You’re going to leverage your course curriculum not only for marketing but also to attract the right type of student customers. As you build out your curriculum, it is essential to clarify is the distinction between modules and lessons.
Modules Vs Lessons?
Modules are the primary components of a course or curriculum. They’re akin to chapters in a book, covering a specific topic or theme. Modules typically comprise several lessons, organized logically to enable learners to progressively build knowledge. Breaking a course down into modules can help instructors stay organized and focused, while also facilitating for learners’ understanding and retention of material.
Lessons are the individual units that make up a course or module. They are comparable to sections within a chapter, addressing specific topics or concepts. Lessons typically include a variety of materials and activities, including readings, videos, quizzes, and assignments. They are designed to be completed within a relatively short amount of time, usually an hour or two at most.
So, envision modules as overarching containers housing lessons. Depending on the course type, your course might feature five or ten modules, each containing numerous lessons. Modules serve as the containers, and lessons are the elements within each module.
The Course Plan
North Star – Draft Title, Marketing One Liner, Audience, and Transformation
Before delving into creating your course curriculum, there are a few preliminary considerations. The first step is to establish your North Star, which will serve as a guiding principle for your course. To begin, define the working title of your course.
The North Star embodies the overarching objective your course strives to achieve. This focus ensures that all lessons work towards a common purpose. Identifying your North Star enables you to develop course content in alignment with it.
Hence, provide both the working title and a succinct marketing one-liner. Tailoring your course curriculum to meet your specific needs and objectives becomes clearer through this process.
Diving deeper, let’s clarify who your course is intended for and who it isn’t. This distinction helps pinpoint the essence of your course and who will benefit most from it. Equally crucial, we must ascertain the transformation that your students will undergo after completing your course.
Imagine, for instance that you are teaching marketing to fashion designers. What exactly will you be teach and at what level? Will it be beginner-friendly or geared toward advanced learners? It’s important to determine the scope and depth of your course content so that you can ensure that your students are getting the most out of it.
Need Coaching? We Got You.
Level up your business with an experienced tech partner.

Check out our 1:1 personal pathfinder, small group leader Zooms, or quick technical audits.
Type of course – Breadth vs Depth, Mini/Spotlight/Workshop/Masterclass
Now, let’s explore the balance between breadth versus depth in your course. Decide the number of modules you plan to include—whether a comprehensive twenty modules or just three substantial ones. Once you have your modules, determine the number of lessons within each. Lessons can span an hour, or you could opt for five 10-minute or five 15-minute sessions. Precise planning here is key.
Furthermore, define the type of course you want to create. Is it a mini course, a free course, a spotlight course, or a workshop, offering valuable skills to students within an hour an a half. Alternatively, are you targeting a masterclass, akin to a certification or a mini degree in a specific topic?
Knowing the breadth, depth, and type of course will help you determine how many modules and lessons you need. You can then start laying out your course and chunking the content at the right level of granularity. Aim for about X modules and each module should have about Y lessons. This facilitates crafting a structured and engaging curriculum, aligned with your learning objectives.
Course Introduction – Overview, Teacher, Bio, How to Take, Dependencies, Surveys
In your curriculum design, consideration must be given to the introduction and conclusion. These sections cover aspects such as teacher’s overview, bio and instructions on navigating the course. Decide whether students should go from beginning to end at their own pace or if they can jump around. Whether they can take it out of order. Consider dependencies like a sewing machine, access to Adobe Photoshop, or software needed for specific lessons.
It’s important to let your students know about these dependencies at the beginning and provide substitutes if needed. Incorporate an initial survey to gauge students’ expectations and motivations. A concluding survey can capture their learnings and transformative experiences.
These surveys are a great way to get feedback from your students and using their own language to enhance marketing materials. It’s important to use their language instead of just marketing jargon. By doing this, you’ll make your students feel good about what they’ve learned and improve your course sales.
Course Wrap-Up – Summarize, Quiz, Celebrate, Bonuses, Survey, Next Steps
At the end of your course, you’ll need to wrap things up properly. This encompasses the survey we mentioned earlier and also entails summarizing acquired knowledge. Consider an end-of-course quiz to test their knowledge. Celebrate and congratulate students’ on completing the course. You can provide them with practical tips for daily life application of what they learned.
As their mentor, recommend what’s next for them. Maybe it’s another course at the next level, joining a community, or seeking coaching. There are numerous options to choose from, but you’ll want to set them off in a valuable direction. This is the outer container of your course, and it’s important to make sure it’s engaging and helpful for your students.
Chunking Your Modules
Your Content Chunks – Modules Using Bulleted List, Spreadsheet, Post-its
As you’re developing your curriculum, it’s time to start identifying the main modules and their contents. So let’s dig into that. Initially, identify the main modules to be included. You can compile these in a Google Doc, a spreadsheet. or visually using Post-it notes.
The sequence of Your buckets – Step by step, Bottom to Top, Ad-hoc Buffet Style
The next big step is sorting. This is where you’ll sequence your buckets and decide on the order for teaching the main modules. Teachers may opt to teach from the bottom up and start with the foundation. While some may prefer to teach ad-hoc buffet style, where there’s just a bunch of knowledge to learn.
For example, in a Photoshop course, you might begin with paint bucket tool, then how to draw lines, and finally how to add text. These modules might appear out of order, but based on your industry, you’ll know the best sequence to teach them.
Name – Parallel From Like Topics or Questions, Simple, Meaningful, Length, Case
When you’re identifying these modules, you’ll will need to give them a good and meaningful name. The titles should be the right size, not too short, not too long. Figure out the title case because as your curriculum will serve as a valuable resource for both teaching and subsequent marketing efforts.
Description – Goal, What’s Included, Will Orient Students, Help You Create Lessons
Now it’s time to describe each module. Give it a description that includes the goal and what’s included. These descriptions can be utilized for marketing purposes or as highlights. When students click on a module, they’ll see what’s in it.
Remember, the descriptions will help orient your students, which is very important in teaching. As an effective teaching technique, it follows the principle of “tell them what you’re going to tell them, tell them, and then tell them what you’ve told them.” These descriptions assist in understanding the module’s purpose, student orientation, and lesson creation.
First, identify the buckets, and then give them a description. This will help figure out the three to five areas you need to cover. Then, identify the lessons for each module. You’ll also have teacher’s notes: how to teach a course and rationale behind the curriculum. If you have any doubts about the order, document them in a note. You’ll have the module names in the right order, and a description of what it’s for (outward facing to your students and customers).
Teachers Note – How, Why, Order Doubts, Camera Setup, Examples
In addition to outward-facing descriptions, you’ll also create inward notes for each module. These notes might consist of camera setup decisions: will you use one or two cameras? Will they be looking at your face or your hands as you teach an instrument or art? What examples or props will you use in this module?
Then, specifically for that module, you’ll figure out if you’re going to have an intro or teach them first. How many lessons you will have in this module. Earlier, you figured out the breadth versus depth. You also want to figure out how many lessons you need to cover for each topic.
Standard Pedagogy – Intro, # of Lessons, Key Takeaways, Quiz, Practice, Discuss
You may want to try to standardize the number of lessons, like three or five, but in some cases, you may have to vary it. For example, it might be a seven-step lesson or you may want to hit a topic briefly.
At the end of each module, there will be three lessons. You might have a key takeaway or a quiz. It doesn’t have to be a giant exam; it could be three, five, or ten questions, and it could be multiple-choice. You can even give them an assignment, like downloading a PDF and trying to play music or recreating something using their quilting skills.
Some teachers like to group a lot of discussions by module. Instead of having one big chat room later, you can have the chats by module. You don’t want to do it by lesson because that might be too minuscule. You might have a couple of comments and questions here and there, but by grouping discussions and chatting with the teacher by modules, you have a great medium level. This way, you can have questions and answers based on module topics instead of being too finite at the lesson level or too high level at the course level because the questions will be all over the place. For such communication structuring, consider your community organization if applicable.
Using a Spreadsheet to Plan Your Course
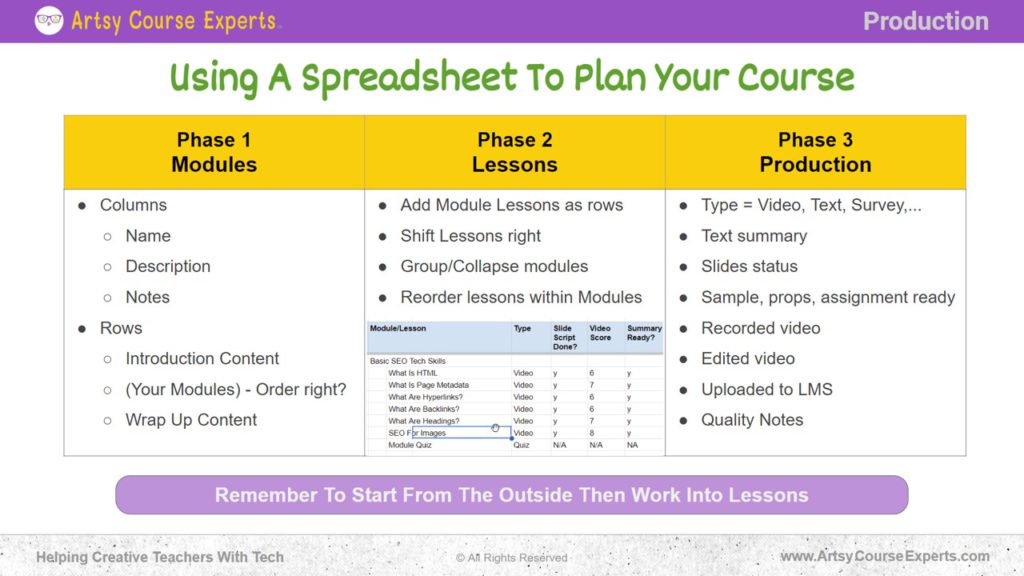
Phase One – Modules
Let’s explore how to employ a spreadsheet for organizing your course into modules, lessons, and project management. Start with identifying modules. You can use a spreadsheet or Google Doc for brainstorming in a bulleted format. The columns should include module names, descriptions, and teacher’s notes—such as camera setup, prop usage, and example choices.
After compiling high-level notes, arrange them in a structured manner. Begin with an introduction and end with a wrap-up. Personalization based on other courses and your insights can be added. Between these, slot in your defined modules. For instance, if you have ten modules, start brainstorming lessons for each.
As you research modules, you might find that some of them are not separate modules but rather lessons or children of other modules. It’s important to keep track of these dependencies. You can use your spreadsheet to create a hierarchy of modules and lessons to ensure everything is organized and easy to follow.
Phase Two – Lessons
In phase two, you’ll start breaking out the lessons and adding them to each of your buckets. It’s important to lay it out in a way that shows the structure, modules, and child lessons if you’re using a spreadsheet. Some people find it helpful to collapse and group rows so they can press a plus or minus to expand or collapse the five lessons in the group. This way, you can zoom out and see the module name, and then zoom in and play with the lessons.
You’ll also want to reorder the lessons within each module, just like you did with the modules in the right sequence. This will help you keep everything organized and easy to follow. Using a spreadsheet can be a great way to keep track of all your lessons and modules. You can color-code them, add notes, and even use formulas to calculate grades or track progress. Remember to keep it simple and easy to read.
Phase Three – Production
In the production phase, you’re ready to assemble your content. You might want to create a project management spreadsheet to keep track of all the information you need. For each lesson, you’ll need to specify what type of content it is, such as a video, text, survey, PDF, or quiz. Also include a summary to explain what the lesson is about.
Creating slides for each lesson can be time-consuming, but it’s an important step. You might also need to create samples, props, or assignments. Try to leverage the same prop or example across the entire module to save time and keep things consistent.
Another important thing to keep track of is your video production process. Did you record the video, edit it, and add an intro and outro? Once you have your videos ready, you’ll need to upload them to your LMS, such as Kajabi or Teachable. Keep in mind that it may take some time for the videos to process and be available to your students.
Once your content is uploaded, perform a quick quality check to make sure everything is working properly. Check the audio and video quality, and make sure everything is visible and showing up correctly. Addition of these details to your project management spreadsheet keeps everything organized.
Remember, the spreadsheet is your friend throughout the entire course creation process. It helps with lesson planning, marketing content, and project management. By leveraging the high-level list created earlier, you can easily keep track of everything and ensure the course is a success.
Frequently Asked Questions About Designing Your Course Curriculum

Summary – Designing Your Course Curriculum
Designing a course curriculum is an essential step in creating an effective and engaging online course. To create a successful curriculum, online course creators should consider the length of their course, the number of modules, and the engagement and interactivity of the content.
Regularly assessing the effectiveness of the curriculum and updating it as needed is also crucial to ensure that the course remains current and relevant. By following these guidelines, online course creators can develop a curriculum that effectively delivers their content and engages their students.
Tips for creating online course creators when designing their course curriculum:
- Work from the top with buckets, figure out those modules, get them in the right order, and figure out the right depth and breadth.
- Work on those lessons and put on your project manager hat or get your team to help you out and start project managing to get every single one of those buckets done.
- If you need to, you could launch with just a handful of modules or a handful of lessons and come back in phase two with additional modules and lessons.
- If you want to level up, you can just work from the outside in a very simple bulleted list. Then take those modules and start filling in what your modules are.
- Keep your curriculum focused and organized by setting clear learning objectives and breaking down content into smaller, manageable modules.
- Regularly assess your curriculum’s effectiveness by gathering feedback from students and updating content as needed to ensure it remains current and relevant.
You should be a little smarter now. Thanks for hanging out!
Please subscribe to get more tips for creative online course teachers.
More Tips For Online Teachers
These lessons can also help you with Operations and Technology:
- VARK Learning Styles For Online Course Creators
- Increase Student Confidence With the Theory of Multiple Intelligences
- Do You Keep Your Prior Course Students Updated?
- How To Create A Guide For Your Online Course?
- Is It Easy For Students To Ask The Teacher Questions?