Introduction
Having a teachable skill is one thing, knowing how to transfer your skills to your students might be a challenge. Skill transfers and online teaching are necessary for a successful online teaching business.
Are you struggling with how to actually teach your content? Well, in this lesson we’re going to learn all about Rosenshine’s principles. That way you can use cool tricks to teach your content. I know you’re a creative teacher, but maybe you’re not an expert, maybe you’re not skilled at teaching, so we’ll go over a bunch of cool tricks on how to teach your students better.
We’re going to learn, what is it? Why use it? How to use it? We’re going to go over an example and finally, we’ll summarize with our top tips.
Challenges course creators may face if they don’t teach using Rosenshine’s principles:
- They will not know if students understand what they’re teaching
- They won’t be able teach their students how to be independent learners
- They will not be able to challenge the thinking of their students
- They will not know the success rate of their students
- They may not provide process for the students to learn faster
Video Lesson – How To Combine Cognitive Science, Classroom Practices, and Cognitive Support To Help Students Learn and Acquire New Information
Who Can Use?
Almost any kind of teacher or professional can teach online using Rosenshine’s principles to seamlessly teach students.
- To use various processes to transfer skills to their students
- To examine the understanding level of their students
- To use independent tasks and reviews to ensure their students get better
This can work for a wide range of online teachers like graphic designers, bloggers, and journalists.
What Is It?
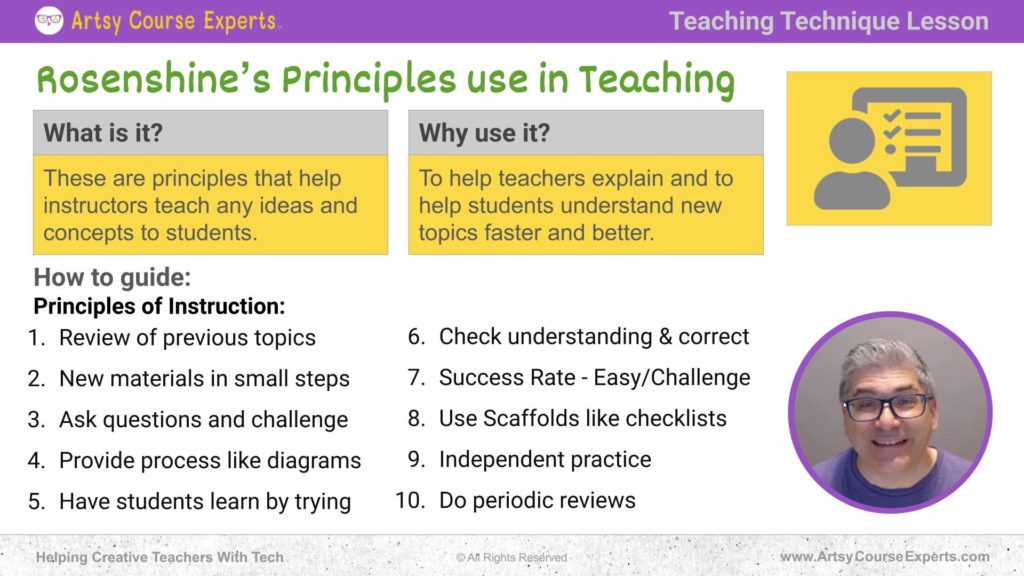
These are principles that help instructors teach any idea and concept to students. So, it’s a bunch of techniques that help teachers teach.
Why Use It?
Well, it helps teachers, coaches, and community leaders explain and help students understand new topics faster and better.
How-to Guide
Let’s get into how to guide. and review the principles.
Principles of Instruction:
Review of previous topics
We’ll go over 10 different principles. The first principle is to review prior topics. So when you’re teaching a new lesson, take a moment and review the prior content. What did they previously learn? What did you go over? What were the foundational blocks? What did you learn in the last two lessons?
What did you just learn in that last lesson? What are some prerequisites that you just wanted to review? If you want to review prior lessons, you have to make sure that their foundation is set. So that’s the first principle.
New materials in small steps
The second principle is to review new content in small steps. Don’t just turn on the water hose and flood them with all new information. They’re on a particular lesson, they’re learning about a new creative topic. It could be design making, fashion, or whatever it is that you teach. You’re going to do that and break that up, you’re going to have a curriculum that breaks up the big stuff into different modules, and then the modules into different lessons.
You’re going to use your curriculum, whether it’s a bunch of PDFs or video courses. You’re going to break up your content and chunk it up. You’re going to break it up into modules, and then you’ll have lessons within each module.
Then you can decide how far and how little you want to break it up. Come up with that basic curriculum to structure it, and then teach every step.
Ask questions and challenge
The third principle is to ask questions and challenge your thinking. You’re going to ask students questions. Take a minute to think how you would do something. How would you solve this particular problem? How would you create this look? How would you create this sound?
You’re going to challenge their thinking and they might have some basic primitive ways to get to that effect, or they might not know about certain tools and the techniques that you’re about to teach them. As you’re doing your modules and lessons, you’re going to want to challenge them and talk about it.
Provide process like diagrams
The next principle is that you’re going to provide process tools, like models and diagrams and flowcharts, You’re going to give them some tools that help them walk through. Here are the four steps, or here’s this cool acronym that helps remind you of what are the five things we need to do related to the topic.
Give them some sort of model, a diagram, an acronym, or something like that to help them understand the higher-level process of doing the thing that you’re teaching.
Have students learn by trying
Then the next principle is to have students learn by trying. Once they’ve learned a couple of steps in a lesson, have them try, have them practice, and follow along. It doesn’t have to be the full lesson. It could simply be a part, a step to having them practice several times until they get that one part.
Then you might do that across multiple lessons or at the end of every module, but have your students practice trying. If you’re an online course teacher, a community leader, or a coach, you might give them templates. Maybe if you are editing video, you might give them those source sound effects.
So, you might help give them some basic tools, and basic elements for them to practice.
Check understanding & correct
The next principle is all about checking for understanding and correcting. So, you’re going to want to look at some stuff that came out. You’re going to want to look at some of the examples that were made by your students and give them the feedback. It doesn’t have to be one on one.
If your diagram came out skewed, well then you need to change this. or your paint is a little too red. In this area, try to do this other thing. So, you know what the common pitfalls are as you’re going through each lesson. give it some more high-end coaching or lessons.
Then they could get some content. They could get some homework and assignments. They might do a show and tell. Maybe there’s a community channel or a discussion group so they can present there. In addition to you being the teacher providing feedback, this will be good for your community and your peers to help out and provide unique points of view.
That may set you up later for, after that high-end course or mid-level course, you can then offer a recurring subscription to a community for coaching or other services like that.
Success Rate – Easy/Challenge
Then the next principle is all about monitoring the success rate of students. How are they doing? This is like testing. Is it too easy for them?
Is it too hard for them? How can you potentially adjust your lesson? Have the students adjust the way they’re taking the lessons. Maybe they’ll stay on a particular lesson until they get to a certain level of proficiency, or maybe if it’s too hard, they have to go back to the last module. They should go back to the last module.
It’s just like sword porridge, not too hot and not too cold. You’re going to want to adjust your outer curriculum, modules, lessons, and your assignments. So, they’re not too easy and they’re a little challenging.
They’re not so difficult that they get stuck and give up on your course. It’s especially those first few lessons you want to build that momentum. Then also remember a lot of people drop out in the later parts of their online course. They just don’t complete it. Maybe they’re bored or they learned what they already needed.
So, you’re just going to want to keep balancing that and provide guidance. You’ll have a general outline, but then also you can give some verbal cues to help them find that sweet spot in your education.
Use Scaffolds like checklists
The next principle is to use scaffolds, things like shackles. These help the students get through content and tasks. So, earlier we learned about models, and now we’re also giving them step by step. Here are the things that you need to do when you’re designing a logo. Do these certain steps.
When you’re cutting your fabric, do these certain steps. You know, it could be a short list. Four or five items, or it could be a longer one. So once you’re done, it could be a longer list, like a 12 step procedure to ensure that your new clothing design is perfect.
Independent practice
The next principle is all about independent practice. So, this is where students go ahead and do something and this could be a little bit bigger than some of the prior things where they were just testing or learning this one step. Now, you’re going to want them to recall to use your tools, your checklists, your flow charts, etc.
Your samples and they’re going to kind of do something bigger from end to end. So this might be at the end of a module, or this might be at the end of your course. You’re going to have them create this one big thing that will prove that they’ve learned and that they completed their journey.
Now they’re at that next level of skill. So this is about independent practice. They could still check-in, but ideally they’re doing something they’ve taught them. They have the resources, content, videos, docs, eBooks, et cetera, whatever it is that you’re teaching with.
They can use that to hopefully create that next thing. That’s the goal of the course. It could be at a module level, or it could be at the whole course level.
Do periodic reviews
The final principle is to do periodic reviews. So that’s where you’re checking in with your students. That’s where students are checking in with the teacher and the instructor. This is just like having a coach in real life. That’s giving you feedback at each of your milestones. So within a course, you might have several check-ins within a community and you might pick a day or a month.
At certain milestones in a program, have people share reviews, give each other feedback and also to post about problems that they might be struggling with. Even though they’ve done something five or ten times, they might still be struggling with something or how to handle certain corner cases.
Maybe your course was a little more general. So the corner cases might be harder to talk about so they can share that. You can provide feedback on those different use cases.
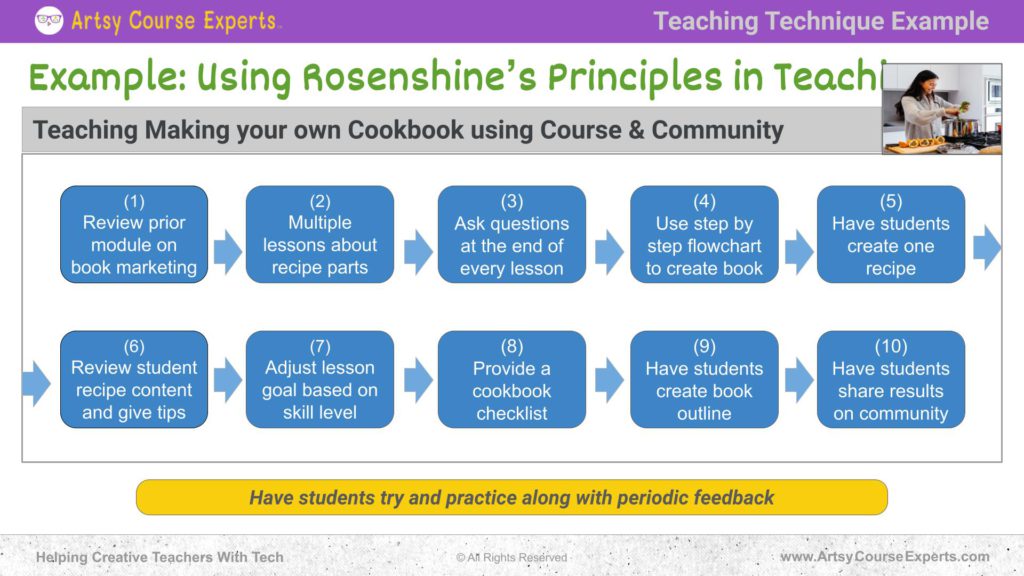
Example: Using Rosenshine’s Principles in Teaching
Now, let’s check out an example. Let’s say you’re teaching how to make a cookbook. You have an online course, you have a community. You’re trying to teach how to make a cookbook. Maybe, you know all about writing and food and that’s your jam and that’s awesome, but maybe you didn’t go to school.
So you need to level up your teaching skills. So let’s talk about how you might use Rosenschein’s principle to make a better course and better community for how to build your own cookbook.
In this example, you’re teaching how to make a cookbook and your students are taking your course and are in your community so that they can make their cookbook for whatever they like.
So let’s go ahead and use the 10 principles and create that cookbook course and community.
Review prior module on book marketing
So first of all, we’re going to want to go ahead and review prior modules. So maybe prior modules talk about marketing and creating a book and what are the parts of a book, So you’re going to just go over those prior things to orient them.
Before you dig into every part of the book, maybe your next few lessons are about the recipes and in the prior lessons you told them about the title and publishing.Then as you’re reviewing you start your next set of content
Multiple lessons about recipe parts
Next you’re going to go over the different parts of a recipe. But there’s a lot there. So you’re going to want to break that out into steps., There’s the photos, there’s the instructions, there’s the ingredients, there’s all sorts of stuff,
Next you’re going to want to break out the difference of a recipe. There’s a bunch of instructions there and you’re going to want to break those out into different lessons. There might be one or more photos. There might be ingredients. There might be step-by-step instructions. So you’re going to want to break all that up.
Then since you’re teaching on how to create a cookbook, this is really important. Those are going to break those out across different lessons. Maybe there’s a whole module on just the recipe part.
Ask Questions at the end of every lesson
You’re going to ask questions at the end of every lesson. So if you’re going over the recipe photos. You’re going to ask questions and challenge the students. What are the important photos that you need to represent the steps in creating this meal.
You know, it’s not just a before and after photo. So you’re going to challenge your students to really think about the things that you taught them so that they can do a perfect job based on whatever cookbook they’re trying to create. Whether it’s Asian, Latino, kids, gluten-free, etc. You’re going to want to challenge them to think about their clients and their needs, using the techniques you’re teaching them.
Use step by step flowchart to create book
The next principle would be to give your students a step-by-step flowchart on how to create a book. Maybe it’s a process diagram that says here are the seven main steps to create the content for your book.
Maybe there’s a separate flowchart on how to publish it. So we’ll do that later, but at least you’re giving them these different charts, models, and frameworks that they can use and follow. Maybe it’s a diagram or how to layout something, here are the five steps to create a cover for your cookbook. Whatever it is, you’re going to give them a flow chart, something to help them out and organize all the different lessons, all the different models.
Have students create one recipe
The next principle is to have students practice. So, you might have them create one recipe. They’re gonna do all the elements that you taught them over a couple of lessons.
The next principle is really about having your students practice. So you might have them create one recipe. That might just be one lesson or you might have them practice on a couple of lessons and do something bigger. So one lesson might be to identify all the ingredients for a particular recipe.
What are they? What are their proper names? What are they also known as? What is the measurement? What condition are the items? Is it cold or warm? So you’re going to want to have them really practice there. Then you’re going to also get feedback and that will help you make your lessons even better.
Review student recipe content and give tips
The next Rosenshine principle would be where you’re reviewing your student’s recipes and you’re giving them tips. You’re looking at the content. Maybe you’d go over a couple of generic examples of first-time recipes and you’re giving them feedback. It could be very personal depending on how much they’ve paid, whether it’s a program or a high-end coaching, or you could just simply go over a couple of different first-time recipes and then give feedback so that students can learn.
So, you’re going to give tips or in a more high-end way, they might be submitting their homework, assignments, or their examples. Through a discussion group or community or even to share like a show and tell with the different classmates.
Adjust lesson goal based on skill level
The next Rosenshine technique would be to adjust your lessons. Based on their skill level, maybe the lesson got too hard or maybe the lesson was too easy. If this is your first time start with just this part. So, you’re going to give them some advice and so that way, every student can push themselves a little harder or make it a little simpler so that they can do it that first time.
Maybe the second time they go a little bit harder. Just like anything, but you’re going to give them that range that will allow them to take this content. Either, get that first version out there or if they already have a little bit of experience and they’re gone, they’re at an intermediate level, or you have a big range in your students.
Some are intermediate. Some are a little more advanced, but they’re not experts yet. So, you’re going to provide some different guidance. In this way, your students can be in that zone that is challenging.
Provide a cookbook checklist
The next Rosenshine principle would be to provide a checklist. You may want to provide a checklist of things to verify before talking to a publisher or before you upload your final content to the self-publishing platform. So, that would be a great checklist. That would be very helpful. They could make sure that the art is high quality.
They have the color and the ISBNs. You as the cookbook expert can help your students with that. A checklist will go a long way. That would be a great PDF resource or a Google Doc resource that you could provide to your students.
Have students create book outline
The next Rosenshine principle would be independent practice. So you might have your students create a book outline all on their own, what they’re thinking about, or maybe it’s just the first few chapters, but it gets them going and it lets them think about every part of the book. So they’re going to create an outline, almost like the table of contents,
They’re going to fill in what’s the intro, what are the sections, and the different kinds of recipes. Maybe every recipe has a history or the goals, it’s up to the different students that create it into cookbooks.
At least you’re going to challenge your students to go ahead and take all these little lessons that they’ve learned. Put it together and really try to do some sort of bigger independent project. That would be a great thing for you to push on your students. So, that they can really do the thing.
Then if necessary, go back to the content, go back to the flow charts and the checklists and all that sort of stuff and make sure that they learn every part that they need.
The final principle would be to get independent reviews. So you would want your cookbook students to share. Maybe they’re sharing in the community or they’re sharing on the online course platform, but they’re sharing their results. They’re sharing their outline. They’re sharing an example recipe.
They’re sharing some art. They’re sharing the angle of the photos that they take for their recipes. Even like the font choices that they’re used for the cover of the book and the font on the inside. So you’re going to want your students to share and then as a coach and their peers are going to provide feedback.
That’s a very important principle in learning and growing is to just get feedback.
In the end, businesses like yours can level up by using some of the Rosenshine principles. At least have your students practice a mini step, practice a big step. Those practice sessions are going to really help them improve their learning. Then you can work in a variety of feedback, whether it’s, an assignment, coaching, a community, or a show and tell, however, you structure it, think about practicing and think about getting feedback into your e-training and eLearning.
Frequently Asked Questions about Teaching Online Using Rosenshine’s Principles

Summary – Teaching Online Using Rosenshine’s Principles
Here are the top things you need to know about Rosenstein’s principles. Review prior topics. Use small steps, ask questions, provide diagrams and flowcharts, have students practice, check their understanding and correct. Don’t be too easy. Don’t be too hard. Use checklists, make them do some larger independent practice and provide periodic reviews.
Tips for creative online course creators when teaching online using Rosenshine’s principles:
- Review prior topics and use small steps
- Ask questions to ensure the students are following
- Provide diagrams and flowcharts for better understanding
- Have students practice, to check their level of understanding
- Allow students to do independent tasks and review the tasks
You should be a little more smarter now. Thanks for hanging out!
Please subscribe to get more tips for creative online course teachers.
More Tips For Online Teachers
These lessons can also help you with Education and Course Content:
- Teaching Creative Online Courses Using Drip Feeding
- Microlearning – Teaching One Small Thing Per Lesson
- Teaching Content Using A Picture-In-Picture Layout
- Hybrid Teaching

