Introduction
Do you want your courses to be seen by prospects on social media? OpenGraph helps you with that. It helps you share pages of your website across social media platforms, and you can automate these processes.
In this lesson, we’re learning all about the OpenGraph protocol. We’re going to learn what is it? Why use it? We’re going to learn how to set it up, and then how to actually share with it. Then we’ll go over an example, and then we’ll wrap up and summarize our top tips. It’s great for instructors, trainers, coaches, online teachers, that’s why you guys should know about this to grow your business.
😰Here are some challenges course creators may face when they don’t use OpenGraph sharing:
- It may be hard to share their websites across social media platforms
- They may find it hard to automate the process sharing important messages
- Relevant content will not reach the target audience
- Their site may not get the visibility that it needs
- Prospects will not get more information about their courses on social media
Video Lesson – How Your Courses Can Be Seen By Prospects On Social Media
What Is It?
It’s a protocol used to share page information, such as the title and image, with various social networks. This protocol enables different social networks to understand which image, title, and snippet (or preview description) to display when links are shared. All these different sharing systems just work whether it’s something traditional like Facebook, or something new like Threads or Tiktok, the sharing just works.
Why Use It?
You want to ensure that your pages preview correctly on all social platforms. A well-presented preview includes an attractive thumbnail, a hero image, a clear URL, and a concise, engaging title that displays correctly across platform
If all these elements are in place, you’ll get more clickbacks and higher clickthrough rates. As you share content, people will be more likely to click back to that source, whether it’s a sales page or a new blog article you wrote. You’ll get more clicks and engagement if what you’re sharing is more than just a URL.
It’s a URL, but there’s also a cool picture, the right picture, because sometimes systems show the wrong image. For example, they might display a general picture about a website or Thinkific when you wanted to show your Thinkific page, course bundles, or resources. That’s why it’s so important.
Once we set up Open Graph and start sharing different pages and content, everything is going to look much better. Ideally, you’ll get more clicks and engagement on those shared links
How-to Guide
Alright, so let’s talk about how to guide.
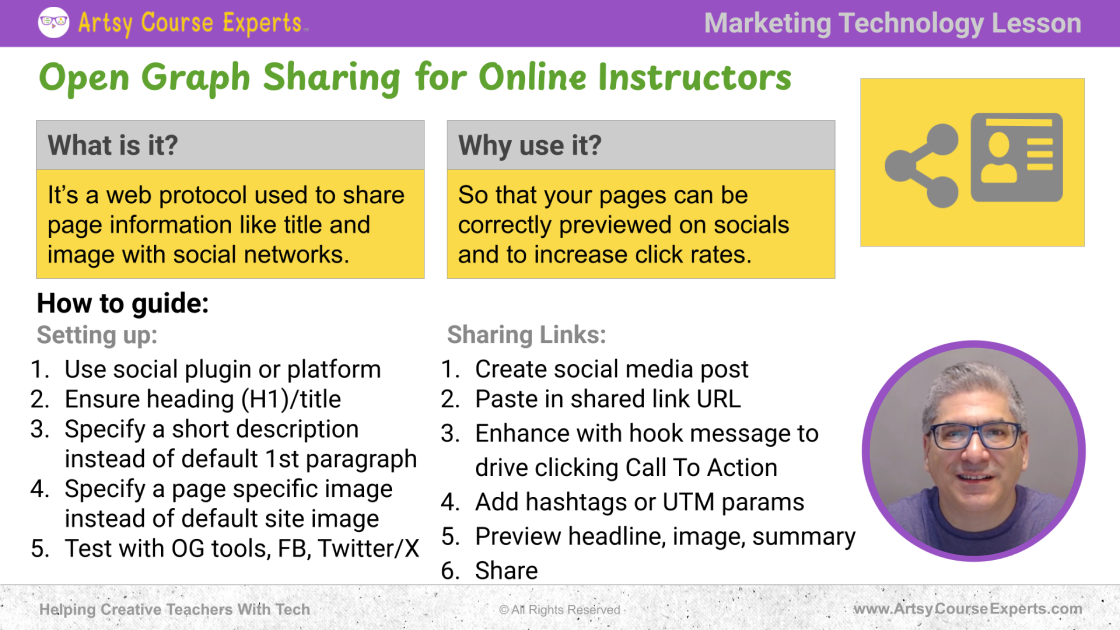
Setting up:
First of all, let’s talk about setting up OpenGraph.
Use Social Plugin or Platform
If you have a website, there are plugins like all in one SEO. There are other plugins that you can get. There’s lots of them that you can get that will make sure that SEO is looking good.
Also, your open graph social sharing is working. What this basically means is this plugin is going to make sure that for each of your very important pages, that you clearly specify the title and the image to show, you may not want to just by default, show your logo.
You may have a really cool hero image that you want, or maybe there’s this other image about, your course program. So that’s the exact image that you would want to show when you share these plugins, making it very easy to configure what information is shown on every one of these pages.
Now, if you’re using another system, like maybe you’re using Kajabi, Mighty Network, Circle, School, Thinkific or Teachable, etcetera. If you’re using one of these other platforms, then they’re going to take care of some of these for you. That’s part of their platform. They know if that page is a course or a landing page or a community.
Based on that, they’re going to use the metadata, descriptions, the hero image and the thumbnails that you’ve set up for those different services. That’s what should be shown when people see that page.
Once you have your platform set up, whether it’s a plugin or using a great teaching platform, you’ll want to check each of your components for that one. You’re going to do this per page for each one of those important sales pages, or for your blog. As an example, the first thing you’ll do is that you’re going to check the heading, this is the title of the page.
This is what happens when your mouse highlights a tab, and it shows you a little snippet. This is often the big, bold letters at the top of your page, your heading. FDL loves this. This is usually the H1 tag, but not always, depending on, you can override it depending on the settings.
Ensure Heading (H1)/Title
So the first thing you’ll do is make sure it’s the right title. Some titles are crazy long and that’s cool. There are a lot of good keywords in there, but for sharing, you’ll just want a really good set, like your brand and maybe about five keywords that describe what that page is all about.
Specify a Short Description Instead of Default 1st Paragraph
You’re going to make sure that you have an appropriate short description. Descriptions could be tricky because sometimes people want to go all in on that description, and then you might get caught. It might turn into an ellipsis. You might only get 20 or 30 words, or depending on the view.
Where you’re sharing, you’re sharing on Facebook versus sharing on Twitter versus sharing in other places. The other side will pick up that description and we’ll potentially edit it or chop it up so that it could show. You’ll want to pick out a good description, but not one that’s ginormous, and not one that’s too short because I mean, after all, it’s a description. It’s your hook line. It’s motivating people to click on something.
Specify a Page Specific Image Instead of Default Site Image
Then you’re going to specify the page specific image. This is the image that’s going to be shown on the other side. You probably have a bunch of images on each of your different sales pages or blog articles, but this is the one image that you want to use. You want it to be able to scale. If you have text, you don’t want text to go all the way to the edges because that image might get cropped or you might only see the inside part or the top part of that image.
You’re going to very carefully pick out that image where the most important elements are in the middle. This is what the video producers call action safe or state the text safe area. You get chopped up at the top bottom left, that middle portion that may be the main character, the photo of your program or PDF or ebook that’s in the middle. Regardless of cropping, regardless of layout, it’s going to be there and then you’ll have the title. Ideally you’ll have the description there as well.
Test with OG tools, FB, Twitter/X
Once you think you’re done setting up, you should test it out. There are OpenGraph tools available; just open Google and search ‘OpenGraph tests.’ Then, type in your URL. This could be your base site or a specific page, like your community page or a particular course. Enter the URL, and the tool will show you how it will likely appear on platforms like Instagram, Pinterest, and Facebook.
Additionally, you can use a tool to do a quick test without posting. Create a mock post, type in some text, and include the URL. You’ll see that it auto detects, goes to the website, and pulls in the Open Graph information. It will try to populate a thumbnail or card with the image, so you can preview how it will look.
At this point, your platform is set up. You know your important pages are configured, making it easier and faster to share in the future. Your infrastructure is ready to go
Create Social Media Post
Now that you have the Open Graph protocol set up on your platform or website, you can start sharing links. You can use a tool to share across multiple platforms, such as social media management tools like Buffer or Hootsuite, or go directly to each social media platform to preview and check how it appears. I would definitely recommend doing that in the beginning.
You’re going to create the post. What text and imagery do you want to share? You’ll include the URL you’re trying to share, and most programs will start analyzing that URL to see if any Open Graph information is available.
What does it know about this specific page, not just the website? Is there a preferred image and title, or should it create one based on the site? If that information isn’t there, it will build a preview from what is available, and then you’ll see the social sharing card. At that point, you may want to enhance it.
Enhance with Hook Message to Drive Clicking Call to Action
You have the title, the image, and a brief blurb, but you’ll want to enhance it. You might skip repeating the title and instead add a touch of motivation or anything that enhances your sales copy.
You can add a bit of extra text either before or after the social media sharing information.
If it makes sense, you can also add some hashtags. Remember, people are searching through a lot of information, with hundreds of thousands of messages per second across different platforms. Using hashtags is still effective, especially if you’re in a specific niche.
For example, if you’re in design, fashion, photography, performing arts, or the music industry, include relevant hashtags. There might be popular hashtags, or you might want to build one where there’s a noun and a verb like teaching music or something like that.
Then from a tracking point of view, from an ads point of view, and from a work point of view, you’ll want to know which one of your platforms is sending people over so you could potentially add some UTM parameters at the end of the URL. You have this URL and it points to a very specific page.
By adding parameters at the end of the URL, you have a question mark, and then you might do some things like source equals, medium equals etc, and these well known parameters can help, like, “Hey, I’m getting a lot of a lot of clickbacks from Pinterest or I.G.”
This way, you’ll understand what is resonating. You could even test different hooks in each place, allowing for A B testing. Then, if you repurpose content later, you can use those top performing hooks to drive even more clicks.
Once your post is set up with the link and hook, and you’ve confirmed that the social media sharing and Open Graph settings are working, along with any tracking and hashtags, you’re ready to share it. You can either schedule it or post it live.
You can use tools to batch share across multiple platforms, but it’s important to ensure that the Open Graph and social sharing settings are in place before blasting posts across different platforms.
This is the high-level guide. First, set up the platform, then start using it by sharing. Initially, you may want to share posts individually, and later, you can switch to batch or scheduled sharing where you won’t need to preview and verify each one
Example: How OpenGraph Is Set Up On Platform
Now let’s check out an example.
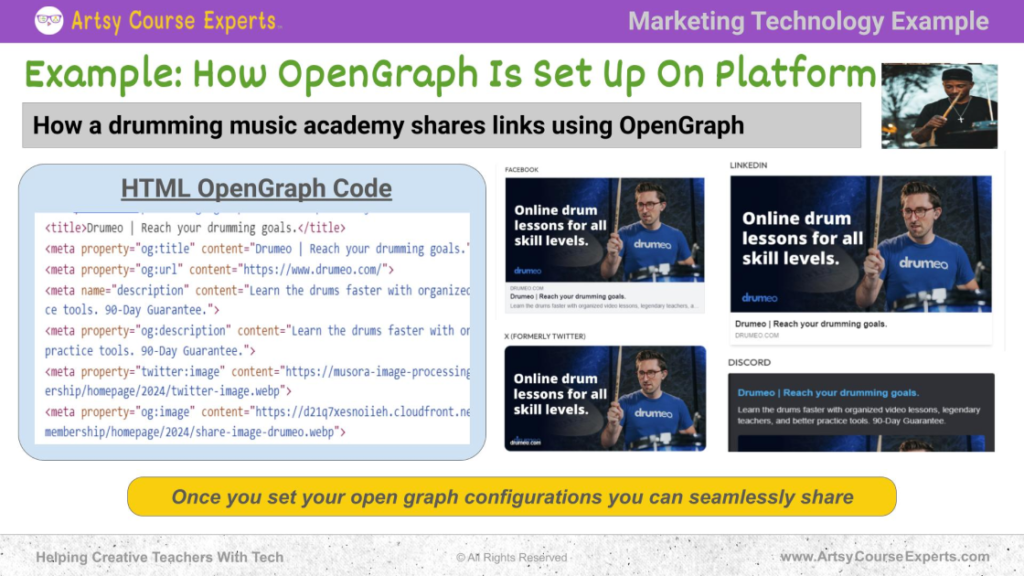
Let’s say you teach drumming. In this case, I’m using an academy called Drumeo. A cool drum teaching academy. Let’s see how OpenGraph is working on this platform. So, they’re teaching drumming, they have different programs, different things, levels and courses and accessories and all these sorts of stuff. Let’s see what their high level sharing is and how they’ve set up their open graph. Remember, whether you’re using a plugin or a platform, the stuff underneath is going to map to HTML, like the code, like JavaScript and angle brackets and all that stuff.
So all HTML pages in case you don’t know, have a head and a body. The head is like, “What’s this page about? Hey, here’s some JavaScript, and here’s some styles for my website.” Then the body is like the actual images and buttons and stuff like that. So, in the head of the open graph, it’s going to have tags, these different little attributes.
If Open Graph is set up, there will be an Open Graph title, an Open Graph URL, an Open Graph image, and an Open Graph description. These attributes will be flagged as Open Graph and are now configured. When platforms like Facebook receive a URL to be shared, they’ll pull in this information to generate the post preview.
Facebook will go back to check the website and download the HTML. It will look at the header and ask, ‘Hey, do you have this other information?’ If not, it may try to figure it out or might not be able to include any extra details.
Platforms like Facebook will return to your page and ask, ‘What’s the official title? What’s the description? What image should I use specifically for this page?’ This applies to the exact URL being shared, such as a specific course or sales page, not just the main website. For example, it might be the homepage of the academy.
When people share this academy on Facebook and include the URL, Facebook fetches these elements to create a nice preview snippet, which serves as the social media sharing card. This works well because, behind the scenes, Facebook was involved in creating the Open Graph protocol.
Facebook, Meta, Instagram, and others will correctly format your Open Graph content to reach the most users. This ensures that whenever fans, students, users, and members share, such as saying, ‘Hey, I use this website,’ the content is shared accurately across various communities, like Discord, Slack, message boards, or any community where students discuss creative skills they’re learning.
In those communities, entering the URL will also pick up Open Graph content, displaying a snippet with the right image, title, and description, and directing the user back to the correct link if they click on the social media share.
Ultimately, businesses like yours can use Open Graph to set up and configure content, then share it seamlessly across all platforms.”
FAQs on Why Online Instructors Should Use OpenGraph Sharing?

Summary – Why Online Instructors Should Use OpenGraph Sharing?
OpenGraph makes sharing on social media better and more interesting. With OpenGraph, you’re not just pasting a plain link on social media, you’re adding pictures, titles, and descriptions to your post. This makes all the difference because it’s easier for people to notice and engage more with your content. As an online teacher, this method promotes your courses, helps you share materials, and enables you to connect with your students more professionally and engagingly.
Also, there are various platforms that support Open Graph, like Kajabi, Thinkific, Mighty Networks, Circle, WordPress, LearnDash, MemberPress and so on. You or your team can share, and when students or others link to your site, they’ll automatically pull in all this extra information for a polished message. Once everything is set up, sharing becomes faster and more engaging.
💡Here are the top things you need to know about this Open Graph protocol:
- You need to set up OpenGraph
- You can set up with any course teaching platform that supports OpenGraph
- Utilize Open graphs to make sharing across social platforms easy
- OpenGraph pulls up nice information about your website it is linked
- Your URL will pre-populate with a little social media sharing card with extra information.
With an open Graph, you’ll see more clicks, more engagement, more shares and more students. Now you’re well-versed in the Open Graph Protocol and how it can help you share and grow your online training business. We hope you put it into practice and watch your business grow.
You should be a little more smarter now. Thanks for hanging out!
Please subscribe to get more tips for creative online course teachers.
More Tips For Online Teachers
These lessons can also help you with Business Tools and Course Content:
- Teaching Online Using Barak Rosenshine’s Principles of Instruction
- How to Use Facebook Ads for Online Teachers and Coaches
- Online Course Progress Indicators
- Understanding Advertising Parameters

