Introduction
Zapier Automation for online teachers involves using a clever tool that makes computer tasks simpler. It can make different online tools collaborate without any manual intervention. In this lesson, we will explore about Zapier automation for online teachers. This way, you, as a small business can be empowered to move faster, save time, save money, and provide better service for your students and clients.
We will delve into what Zapier automation is, its uses, how to use it, and then we will examine an example before summarizing our top tips.
Challenges online course creators can face if they don’t use Zapier automation for online teachers:
- You’ll require additional personnel to handle tasks that Zapier can automate. This might entail recruiting people from various time zones and shifts.
- It could lead to many manual errors, potentially reaching up to one in every ten tasks.
- The absence of Zapier automation can lead to a heavy workload for delivering top-notch service.
- You’ll likely start overlooking essential steps due to the overwhelming workload.
- Over time, your efficiency might decrease, causing dissatisfaction among students due to the declining service quality.
Video Lesson – How to Enhance your Online Courses using Zapier, Making your Online Teaching More Efficient and Engaging.
Who Can Use It
Zapier automation can be used by any teacher, professional, or coach to automate notifications for course updates and keeping students informed.
- Automate enrollment confirmation emails, ensuring students receive instant access to course materials.
- Integrate with design software to provide instant access to pattern templates upon enrollment.
- Integrate with social media platforms to share captivating animation snippets and attract learners.
This can work for a wide range of educational businesses like pattern designing, proofreading, and product designing.
What Is It
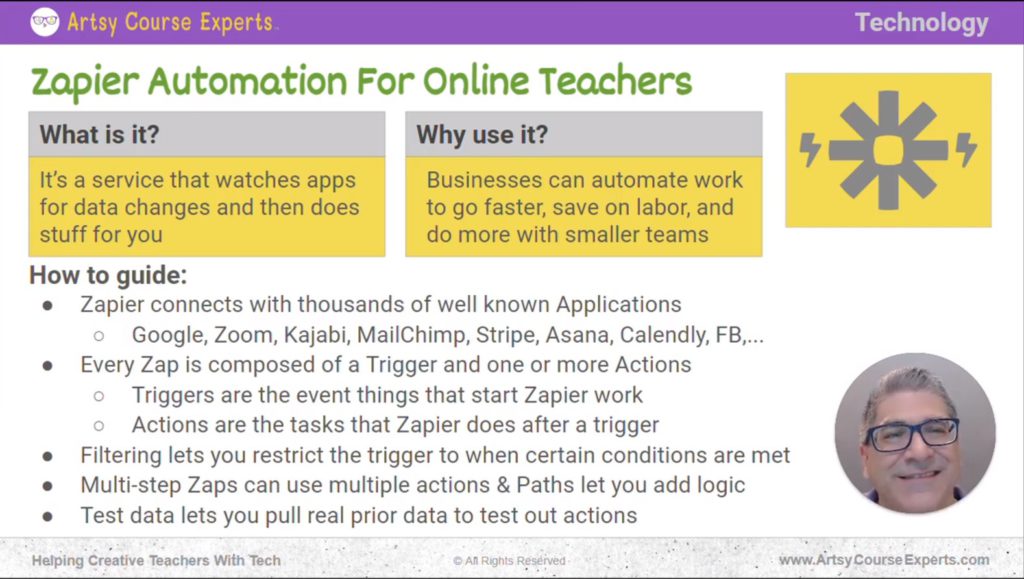
Zapier is a service that monitors apps or data changes and performs tasks on your behalf. It’s a website where you provide information, instructing it to monitor another website you use.
For example, you might request Zapier to observe your Google Sheets for any new rows being added. Once a change is detected, it takes action based on your instructions. You can, for instance, set it to send an email.
In essence, Zapier is like a helpful robot that can make different apps and tools work together automatically.
Why Use It
Businesses can automate tasks to increase speed, reduce labor costs, and achieve more with smaller teams. With Zapier, you and your small team can efficiently perform numerous tasks rapidly, accurately, and around the clock. This is achieved by using Zapier to automate various tasks for your business.
How To Guide
Here’s a how-to guide on Zapier automation for online teachers:
Zapier Connects with Thousands of Applications
To begin with, Zapier connects with numerous well-known applications. These are the standard apps that we all recognize and use, including Google, Zoom, Kajabi, MailChimp, Stripe, Asana, Calendly, Facebook, Twitter, and many more.
Need Coaching? We Got You.
Level up your business with an experienced tech partner.

Check out our 1:1 personal pathfinder, small group leader Zooms, or quick technical audits.
Even if it doesn’t have direct connections with certain apps, you can still use RSS feeds. These allow you to receive updates about changes from other applications. For example, you could receive an input telling you you’ve just posted a new YouTube video. Based on this, you could email the marketing team, notifying them that the YouTube video is now live.
Every Zap is Composed of a Trigger
Zapier operates through Zaps; each Zap consists of a trigger and one or more actions. Let’s delve into that. The trigger initiates Zapier’s work—it’s like the input that kickstarts the entire sequence. The actions are the tasks that Zapier performs after a trigger event occurs.
So, a Zap has two components. Firstly, it’s actively monitoring events occurring externally. Then, when that specified event takes place, it comes into play. There are various recognized triggers available. For instance, using Google Docs, a trigger could be someone adding a new row.
An action could involve sending an email. For each of these, multiple attributes come into play. You might specify which spreadsheet to monitor or whom to send an email to. While numerous attributes are involved, at a higher level, you’re creating Zaps within Zapier. Each Zap has a trigger, signifying the system’s readiness to respond when a specific event occurs.
The associated action follows suit when that event happens. Once you configure and publish your Zap, it becomes live and consistently performs its designated tasks.
Filtering Lets You Restrict the Trigger
You can also filter Zaps, which means you can restrict the trigger only when certain conditions are met. For example, consider monitoring when new rows are added to a spreadsheet. You might have a field indicating if they bought your coaching or subscribed to your course. So filtering could be used to specify that the action should apply only to people who have bought my course.
Filtering allows you to receive the event notification when something has just happened, then analyze the event, and based on that, you decide whether to proceed with an action.
Multi-Step Zaps Can Use Multiple Actions
You can also include multiple steps in a zap. Imagine having a trigger followed by a series of actions. For instance, when a specific event occurs, you can execute actions one, two, and three.
Furthermore, you can incorporate paths that introduce logic, like performing actions based on certain conditions. For instance, if they bought your community, you might execute one action. However, if they purchased your online course, you could perform a different action.
Test Data Lets You Pull out Various Data
After configuring your ZAP by adding a trigger and one or more actions, you can proceed to test your data. Testing is beneficial as it uses real sample data. For instance, if you have customers who have purchased from you, the system will analyze past transactions. Then, you can experiment with potential actions involving them.
For instance, you could leverage the customer’s name to execute a specific action. Let’s say, for example, you want to create a folder using the customer’s name.
Testing allows you to select sample recent customers, load their fields, and choose one for testing a specific action. For instance, your action might involve creating a Google folder named after the customer. This is the action you’ve configured. Once you’ve selected a customer, click “test.” The system will use a recent customer profile with various data fields. You extract the relevant information for your action.
For example, you specify creating a folder in a parent directory and having the child folder named after the new customer. Use the test button to experiment with the action. Check your browser to confirm if the folder was successfully created. If everything works well, you can proceed to publish your ZAP. This adds your ZAP to your collection of ZAPs.
In this manner, you can have one or more ZAPs that perform various tasks. Assign meaningful names to them for different parts of your business, such as administration, finance, legal, onboarding, community courses, and more.
Example: How Teachers and Students Can Use Zaps
In this example, we’ll explore how teachers and students can benefit from using zaps. Students won’t even be aware of Zapier working behind the scenes; they’ll enjoy all the advantages.
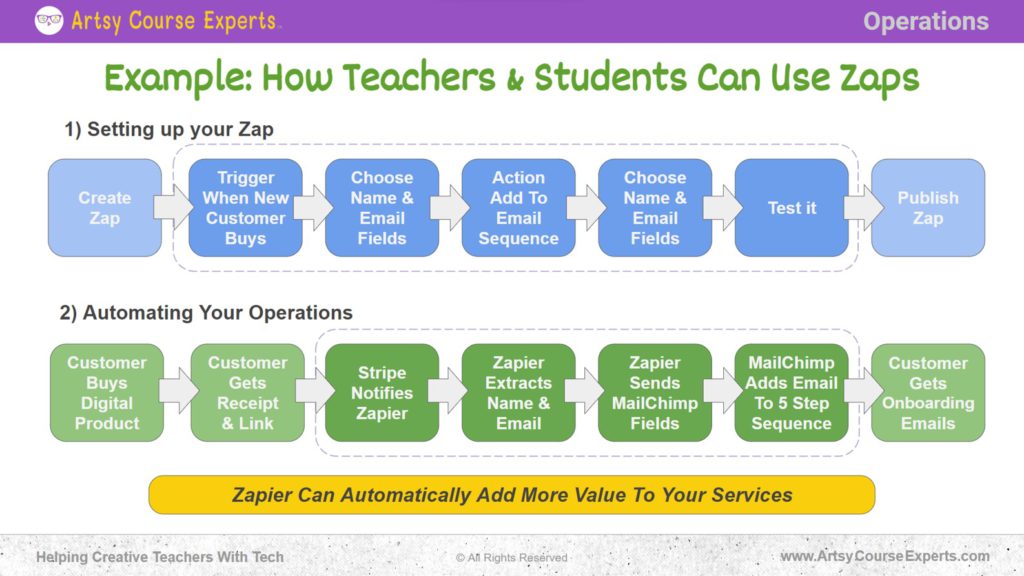
Setting Up Your Zap
Create Zap
Creating a Zap is the first step to making your tasks simpler and more automated. Imagine it like giving instructions to a digital helper. To start, as a teacher, you would log in to the Zapier website or app. Then, you create a zap, like setting up a chain reaction of actions.
Trigger When New Customer Buys
The initial step involves specifying a trigger. This determines what will initiate and ultimately lead to the action being executed. In this case, we will establish a connection with Stripe and define the trigger as when a new customer makes a purchase.
Connecting to Stripe provides access to various events, such as a payment failure, the addition of a new customer, or the initiation of a new subscription.
Choose Name and Email Fields
You’ll pinpoint the exact event you want when a new customer has paid. This serves as the trigger. Subsequently, you’ll identify that specific event and the corresponding set of data fields it captures. From there, you’ll proceed to select the necessary fields.
For this scenario, we’ll opt for the customer’s name and email address as the two essential fields to be included. Now, let’s move on to choosing an action.
Action Add to Email Sequence
Whenever a new customer signs up, we’ll extract their information and proceed with an action. In this action, we’ll select an email provider; let’s go with MailChimp. Our goal is to add a new email subscriber to your audience.
To successfully add a new email subscriber, we need to input certain data. For this, we’ll use the name and email of the customer received from Stripe. By tagging and completing these two fields, we fulfill the requirement.
Test It
Once a new customer signs up, we extract their information and initiate an action. Specifically, we opt for an email provider, and in this case, let’s select MailChimp. The objective remains to add a fresh email subscriber to your audience.
To effectively include a new email subscriber, necessary data must be provided. Therefore, we employ the customer’s name and email, both obtained from Stripe. After tagging and filling in these details, you’ll observe that certain fields get populated. When you hit the “test” button, you can proceed to MailChimp and verify the addition of a new audience member from a recent customer.
Once you’ve successfully tested the process and confirmed that all fields align correctly—without the name ending up in the email field or vice versa—you’re ready to proceed.
Publish Zap
Once you’ve confirmed that you have the correct steps, you’re all set to proceed. At this stage, you can publish your zap, making it live. It becomes part of your collection of active zaps, consistently operating for you—even when you’re asleep or engaged in other activities. These zaps are diligently working for you as a teacher.
Automating Your Operations
Now let’s look at automation from your student’s point of view:
Customer Buys Digital Product
Firstly, a customer goes and purchases one of your digital products. That’s the triggering event. They visit a website, whether Thinkific, Teachable, Kajabi, or any other platform, and purchase from you.
Customer Gets Receipt & Link
The system is automatically linked to Stripe. Consequently, this customer receives a receipt, perhaps containing a sign-on link. Behind the scenes, Stripe has already processed the transaction. Due to this, you’ve set up a trigger in Stripe to monitor your account and inform you about any occurring events.
Stripe Notifies Zapier
Stripe then proceeds to notify Zapier that it knows it wants to be informed about all transactions related to this specific teacher. Because of this setup, with your Zap configured, Zap extracts the name and email fields. This is in response to what you’re listening for and what you’ve designated in your trigger to capture from this event.
Zapier Extracts Name & Email
Since everything looks good, Zapier begins to do the action because this is the event you were listening for. Now you have the data, and Zapier begins to act. It then tells MailChimp it needs to add a subscriber to its audience and passes on its name and email information.
MailChimp then begins the sequence when a new subscriber gets added to MailChimp, and it should start sending these emails automatically each day.
Zapier sends MailChimp Fields
On day three, you’ll send another email. Two weeks later, you’ll execute a different event. MailChimp initiates the sequence you’ve set up.
MailChimp Adds Email to 5-Step Sequence
As a result, your customer begins receiving onboarding emails. After purchasing the digital product, you’ve linked it to your email system. This triggers the sending of an onboarding sequence. They receive all the necessary information, and you can also implement additional actions, of course.
Customer Gets Onboarding Emails
If you want to enhance your capabilities, consider creating a free Zapier account. Connect one or more of the systems you use regularly, such as Google Docs. Zapier has the potential to significantly streamline and add value to your services. It can effectively multiply your team’s productivity.
Frequently Asked Questions About Zapier Automation for Online Teachers

Summary – Zapier Automation for Online Teachers
In summary, Zapier is an automation platform for various systems and applications. You instruct it regarding what to monitor, and it takes care of tasks on your behalf. Many of the manual tasks your team handles can be automated with the assistance of Zapier.
Zapier is a valuable ally, offering a bridge between different tools to automate tasks seamlessly. By harnessing its abilities, teachers can devote more time to what truly matters: educating and engaging with their students.
Tips for creative online course creators when using Zapier for their online courses:
- Use Zapier to send personalized welcome emails automatically when new students join your course.
- Automate student data entry into spreadsheets to keep track of progress and engagement effortlessly.
- Set up Zaps to notify you when students complete quizzes or assignments, enabling prompt feedback and support.
- Automate announcements to your course platform, keeping students engaged and informed about upcoming lessons.
- Integrate tools like Google Docs or Slack through Zapier to collaborate with fellow teachers and improve the student learning experience.
You should be a little smarter now. Thanks for hanging out!
Please subscribe to get more tips for creative online course teachers.
More Tips For Online Teachers
These lessons can also help you with Operations and Technology:
- RSS Feeds For Online Training Business Owners
- Google Analytics GA4 for Online Teachers and Trainers
- Artificial Intelligence Tools for Online Course Creators
- Online Course Auto Play And Auto Complete Settings
- Faculty Focus – QR Codes For Quick Student Engagement